High
It is closer or even higher than the dynamic range of the human eyes, where for a digital camera can only capture a third of our dynamic range in a single shot. The result image of a HDR photo in general looks very sharp with long depth of field, clearly detailed in the darkest to lightest areas, and has a wider range of colors, often resembling to contemporary hyperrealistic paintings. It seems “more real” than reality. Even though it is close to our eyes’ dynamic range, HDR photo somehow seems to show an “enhanced” reality or a clearer reality. This is the purpose of the exercise, which is to show such capabilities in digital photography and imaging, and how you can explore such hyperrealism. This is truly an experiment that has been impossible to capture using only traditional photographic methods. Approximate exposure ranges of photographic capture and storage media. From top to bottom: Finished Print, Computer Monitor, Transparency Film, Digital Camera, Negative Film, Normal Human Vision, HDR Image.
For examples of HDR photos, you can go to Flickr and type in "HDR", or click here, or join one of the HDR groups.
HDR photos are multi-exposure blended photos taken at a constant aperture setting with different shutter speeds and then blended into High Dynamic Range images with either Photoshop or another great program specially made for HDR called Photomatix. You can download the free trial here.
After generating your HDR composite, there is a process called Tone Mapping, where you are converting from a 32-bit image into a lower 16-bit or 8-bit image, this can be done also in Photoshop or in Photomatix.
Now, instead of rewriting or RSS feeding the full techniques here, I'll give you some links that are very good in giving directions on how to make HDR photos:
- How to Create Professional HDR Images
- The Definitive Guide to Realistic High Dynamic Range Images
- Modern HDR photography, a how-to or Saturday morning relaxation (has a complete explanation about HDRi)
- HDR Tutorial: How to create ‘High Dynamic Range’ images using Photomatix
The exercise is to create your HDR photograph by using 3 or more exposures. Try 5 or even 7. You could either use Photoshop or Photomatix-and-Photoshop. Any software you like.
Turn in and show your multiple exposures and your final HDR photo result.
FULL BONUS POINTS IF YOU COULD ALSO EXPERIMENT AND MAKE A STITCHED or PANORAMIC or 360 HDR!!!
Take a peek at:
- www.360icon.com
- www.panoguide.com
- High Impact Photography with Panoramics
Tuesday, March 25, 2008
Photo Journal/Exercise 6 (Photo-DI): High Dynamic Range (HDR) Photography
Monday, March 24, 2008
Photo Journal/Exercise 5 (DI): RESTORATION
Old family photographs are such precious artifacts. Going through my father's bookcase I found an old album containing old photographs of my late great grandfather's family. My father only remembers his grandfather and grandmother in these pictures, other members he can barely remember. These photographs carry such interesting clues to the past ways of life, especially about the Chinese Indonesian families during the early 1900's. Note that the men in these pictures wear European (Dutch) style suits, whereas the women wear traditional Javanese dresses. And there's a plant sticking out in the middle of the picture that might be seen as funny. Why didn't they just move it and replant it after taking the picture? But I think it can also be seen as respectful towards all living things, including plants. "Let it be in the picture with us" :)
 This is the first digital imaging exercise for the XP class, when we start to shift modes from being a photographer to being a photoshoper :) . There's something interesting also about utilizing modern digital technology, for something old and has a timeless value. With this Restoration exercise, we are utilizing most of the tools used for adjustments and retouching in Photoshop. It is a complex artform in itself. But it is a good exercise to be able to dive into DI quickly, and at the same time making something positive out of it for your family. You could even make it into your personal/family project.
 So... the exercise is to restore one of your own family's old photo to its probable original crisp condition, whether in B&W or Color.
Then create 2 versions from it: 1 GOOD B&W PHOTO & 1 GOOD COLOR PHOTO.
- If you have a B&W PHOTO, you need to color it (use the Color blending mode in the Layer panel; using a mousepen would probably be better).
- If you have a COLOR PHOTO, you only need to create a B&W version after you've reconstructed the color to a "proper" condition (use Channel Mixer).
Some more rules & tips:
- Make sure the photo is from your own family/relative or your close friend. Stay away from copyrighted photos.
- Choose a photo that needs restoring the most (like the second photo seen above).
- Remember about non-destructive editing. Keep your original scan on the background layer. Use MANY Adjustment Layers & Maskings to edit selectively (for example Curves adjustment just for the needed areas, and cover the rest that don't need it with masking). Also remember that you can CLIP your Adjustment Layers just for a specific Layer without affecting other Layers below it.
To turn in with a CD:
- Save your original PSD file(s) with the complete layers.
- Save a copy also for each of your BEFORE & AFTER pictures to medium JPEG's for fast review. (1 Before photo, & 2 After photos: in B&W & Color).
You can go to digitalretouch.org for some references.
Monday, March 10, 2008
Photo Journal/Exercise 4: JUXTAPOSITION - Creating New Interpretations
One of the trade secrets or strategies of advertising and contemporary art is the unexpected juxtaposition of things unrelated to attract attention, shock, puzzle, or question people's perception of those things. We can look at Oliviero Toscani's works for example for the United Colors of Bennetton campaign.
This is just one example of many. And when we realize this, we can start to be aware that we are a part of the photograph, because as a viewer, we start to interpret what we see according to our background knowledge, and give NEW meaning(s) to the things posed together on the same scene/photo/frame. So meaning doesn't necessarily comes from the photo, but from the viewer.
A good example would be a Popeye action figure next to an olive fruit. Although these two are unrelated in the type of object they are, when juxtaposed together in the same scene the olive fruit gains new meaning (because of our knowledge of Popeye's wife's name "Olive").
The challenge is to create 10 new photographs that contain interesting/shocking/thought-provoking juxtapositions.
- All subject matters must be different.
- Also try to create unexpected or almost random juxtapositions, and not simply pairs of opposites, that create new meanings and makes the viewer thinks or tries to interpret it in different ways.
- Digital imaging or manipulation is allowed for this exercise. You could "force" your juxtapositions in Photoshop or staging them for the shoot. However, if you could capture juxtapositions as is seen on the spot, that might be better.
For those of you who are itching to get into DI, you can take a look at the works of Platinum FMD for examples. If you decide to manipulate your image, then you have to really be "extreme" in your juxtapositions.
And here are some examples of juxtapositions as seen on the spot...

Here you could see a dead cow and two living pigs in the same river. The cow is left to rot and the pigs are oblivious to the scene and just trying to survive. It gives a feeling of irony between the living and the dead. (Somewhere in Nepal)

Without trying to offend a certain belief... I entitled this Goddog/Doggod --playing with words, because of the juxtaposition of the dog and the dog-like statue. (Kathmandu)
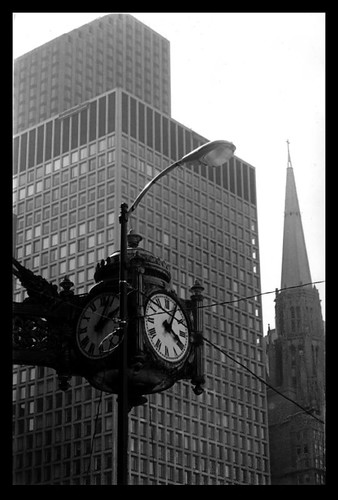
There are three subject matters that are juxtaposed into this one frame; the clock, the modern skyscraper, and the old chapel. The juxtaposition creates a sense of time gap between the old and the modern. It's entitled "History", taken in downtown Chicago.
Reduce, Reuse, Diffuse: Make Your Own Flash Diffuser from an Old Film Container

A fun tip taken from photojojo which followed flickr user natuurplaat's lead. And here's the result...
Before...
After...
Wednesday, March 5, 2008
Photo Journal/Exercise 3: MUSIC - Abstraction & Staged
Pick out a song that you like from a band or any musician. It could be instrumental or with lyrics. Then try to photograph something inspired by that music. Get image ideas from its melody, its rhythm/beats, its lyrics, etc. Be poetic. Be artistic.
There are 2 sub-challenges for this exercise.
The first is to shoot abstract photos, and the second is to create staged visualizations of it.
Make about 25 photos of a combination of both types, abstract & staged. Then choose the best 3 for each. Both types are very different in their thinking and process of creating.
The goal of this exercise is to have us translate the language of music into the visual language, which most of the time can speak about similar things, such as rhythm/pattern, melody/line, moods/textures or colors, and so on --this might be for the abstract photos. But also for visualizing a song into a more illustrative and realistic image by staging it. For examples of staged photos you could look at the work of Gregory Crewdson. And for abstract photo examples, you can just go to flickr.com and type in "abstract" in the search box. All photos tagged abstract will show up.
There are several tips for making photo abstractions with your camera:
1. Make it blurry (have either your camera or your subject matter move)
...There's a group in flickr that tosses their cameras with the timer set, so that it'll shoot while flying in the air... (this technique is not suggested though =D )
2. Make extreme close-ups until the subject matter is unidentifiable or almost unidentifiable
3. Make long exposures (at night with moving lights for example)
4. If you have a camera set for infrared, or you have special lenses/filters, use them, but always remember to make your subject matter be vague.
5. Look for strange objects (or their shadows...)

They resemble abstract paintings.
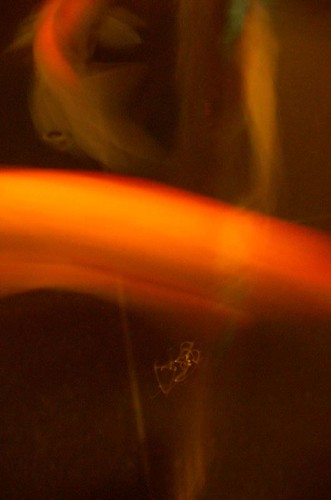
I see them as paintings on canvases with expressive and fiery brush strokes.
These were done with some croppings.

now here you can see the painters...
(btw, this one doesn't count as an abstract photo since you can immediately identify the subject matter and it shows a clear setting and space; only the top two count as abstracts)
Sunday, March 2, 2008
Fine Art Photographer Kaoru Tohara


I finally got in contact again with one of my professors Brenda Mitchell, and her spouse, my mentor-friend fine art photographer Kaoru Tohara, whom I've had worked for also. I remember those days working with Kaoru setting up and sorting out about 700+ photos shot for an online TOEFL test. Anyway, this is his website www.sureshot10x.com with his most recent works of Portraits and Pittscapes (Pittsburgh cityscapes) you should check it out! I see his works as genuinely spirited, and also something that has to be seen/or met in real/in person. All works are silver gelatin prints.
Photo Journal/Exercise 2: DESIGN ELEMENTS part 2: LINE, SHAPE, FORM
Continue the Design Elements exercise with Line, Shape, and Form. Take about 50 pictures for this one, then choose 10 of your best. You may sort out your old photos or better yet, take new ones. Lines may be straight, curvy, diagonal, in repetition, etc. The simple difference between Shapes and Forms is that Shapes are 2 dimensional and Forms are 3 dimensional, showing more shadows and highlights that show depth and mass. The most basic shapes are usually silhouette pictures, but try to find others.
But please remember that I'd like to post YOUR BEST PHOTO results here. So feel free to post me a link to your photos.

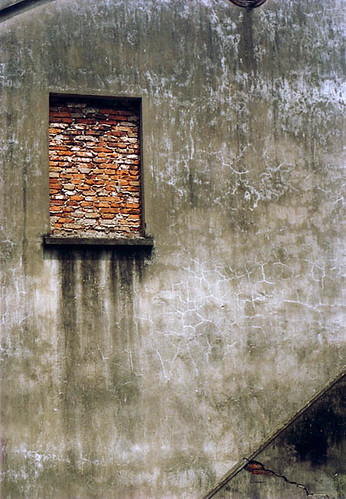
Besides in silhouettes, shapes can be found in many places such as walls or building parts. Try to find geometry in things and build a composition from that. Always remember the Rule of Thirds. Photo taken in a village close to Beijing.

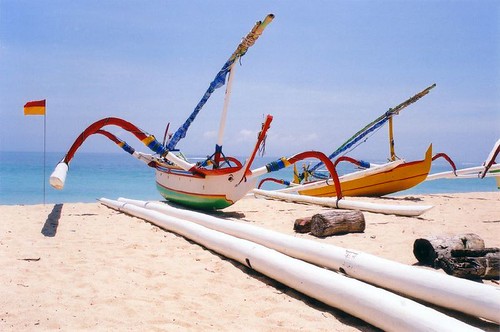
Forms can be found in all things that provide information for it, such as shadows and highlights to show depth and volume or mass. But this photo also shows form from the wire-frames or the grids that lit up from the inside of the lampions. This picture was taken from a lampion festival in Laguna, Surabaya.


